
💻 TSConfig 파일이란?
TypeScript가 실행되기 위해서는 JavaScript로 사전에 컴파일(트랜스파일이 좀 더 맞지만 컴파일이란 용어를 사용하겠습니다.)되어야 합니다. 이 단계에서 사용되는 옵션들을 json 형식으로 작성한 파일이 TSConfig 파일입니다. TSConfig 파일에서 사용되는 옵션들은 CLI의 플래그로 지정해 사용할 수도 있습니다.
TSConfig 파일이 존재하는 디렉토리는 TypeScript 프로젝트의 루트임을 의미합니다. 만약 tsc 명령어를 실행한 디렉토리에 TSConfig 파일이 없다면, 컴파일러는 TSConfig 파일을 찾을때 까지 프로젝트 디렉토리를 순회하게되고, TSConfig 파일이 있는 디렉토리를 루트 디렉토리로 간주합니다.
-p 또는 --project 플래그에 TSConfig 파일이 있는 디렉토리 경로나, TSConfig 파일대신 사용할 파일의 정확한 경로를 전달하면 TSConfig 파일을 직접 설정 할 수 있습니다.
1
tsc -p path/to/tsconfig.json
💻 TSConfig 파일의 구성
TSConfig 파일은 아래와 같이 크게 다섯가지 옵션으로 구성되어있습니다.
1
2
3
4
5
6
7
8
{
  "files": [],
  "extends": [],
  "include": [],
  "exclude": [],
  "references": [],
  "compilerOptions": {}
}
위의 다섯가지 옵션은 다시 두가지로 분류 할 수 있는데 Root Option, Compiler Option 입니다.
Root Option
Root Option은TSConfig옵션중files,extends,include,exclude,references를 의미합니다.
이 옵션들은TypeScript프로젝트의 설정 방법과 관련된 옵션들입니다. 예를들어, 어떤TypeScript파일이 컴파일 되어야 하는지를 설정할때 해당 옵션을 사용합니다.
(❗️references의 경우tsc CLI에서 플래그를 통해 설정할 수 없습니다.)Compiler Option
TypeScript컴파일러에 대한 설정입니다. 예를들어, 컴파일된JavaScript파일이 위치할 디렉토리 설정을Compiler Option에서 정합니다.
💻 Root Option
👨💻 files
Default: false
컴파일하고자 하는 TypeScript 파일들의 경로를 배열로 전달 합니다. 이때 경로는 상대경로와 절대경로 모두 가능하지만, 상대경로는 TSConfig 파일의 경로(root)에 대한 상대경로 입니다.
아래와 같은 디렉토리 구조를 가진 프로젝트가 있다고 가정해보겠습니다.
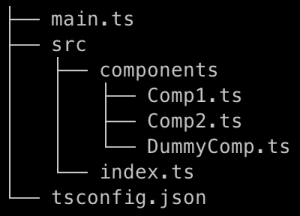
위 구조를 가진 프로젝트에 TSConfig 파일의 files 옵션은 다음과 같이 작성했습니다.
1
2
3
4
5
6
7
8
{
  "files": [
    "./main.ts",
    "./src/index.ts",
    "src/components/Comp1.ts",
    "src/components/Comp2.ts"
  ]
}
각 파일들의 경로가 TSConfig 파일의 위치에 대해 상대경로로 작성되었음을 알 수 있습니다.
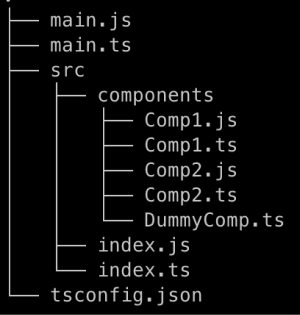
옵션에 명시해준 파일들은 tsc 명령어를 실행할 경우 컴파일되어 JavaScript 파일이 생성됩니다. src/components/DummyComp.ts 파일은 배열에서 제외되었기 때문에 JavaScript 파일이 생성되지 않습니다. 또한 컴파일된 파일들의 생성 위치를 특별히 지정해 주지 않았기 때문에 원래의 TypeScript 파일이 위치하는 곳에 생성됩니다.

🖊 루트 디렉토리 외부의 파일
TSConfig가 있는 위치(루트 디렉토리)보다 상위에 위치하고 있는 파일도 컴파일 할 수 있습니다.
위 예시는TSConfig파일이 위치하는 디렉토리 외부에outside.ts라는 파일이 존재하고 있는 구조를 나타내고 있습니다.outside.ts를 컴파일 하려면TSConfigfiles옵션을 아래와 같이 설정해야 합니다.

👨💻 include
Default: [] if files is specified; **/* otherwise
컴파일 하고자 하는 TypeScript 파일의 이름이나 경로를 배열로 전달합니다. 이때 glob pattern을 사용할 수 있습니다. 패턴을 사용하여 파일들의 경로를 명시 할 수 있어, 다수의 파일을 포함할 때 files 옵션보다 유리합니다.
🖊 glob patterns
?하나의 문자와 일치합니다.*0개 이상의 문자와 일치합니다.**모든 레밸에 중첩된 모든 디렉터리와 일치합니다.
1
2
3
{
  "include": ["./main.ts", "./src/**/*.ts"]
}
위의 TSConfig 설정은 main.ts 파일과, src 디렉토리 하위의 모든 디렉토리 및 파일을 컴파일 대상으로 포함한다는 의미입니다. tsc 명령어를 실행하면 아래와 같은 결과가 나옵니다.

만약 디렉토리 경로에 확장자를 명시하지 않는다면, .ts 파일과 .d.ts 파일이 모두 포함되며 만약 allowJs 옵션이 true일 경우 .js 파일도 포함됩니다. 즉 ./src/**/*는 ./src/**/*.ts, ./src/**/*.d.ts, ./src/**/*.js(allowJs가 true인 경우)를 의미합니다.
👨💻 exclude
Default: node_modules, bower_components, jspm_packages, outDir
include에 포함된 파일중, 컴파일에서 제외할 파일들의 이름이나 경로를 배열로 전달합니다. include와 마찬가지로 glob pattern을 사용할 수 있습니다.
include 옵션에서 살펴본 TSConfig 파일은 src/components/DummyComp.ts도 컴파일 대상으로 포함이 됩니다. 해당 파일을 제외 시키려먼 exclude 옵션을 추가해주어야 합니다.
1
2
3
4
{
  "include": ["./main.ts", "./src/**/*.ts"],
  "exclude": ["./src/**/DummyComp.ts"]
}
위 예시는 include에 명시된 컴파일 대상에서 src 디렉토리 하위의 모든 DummyComp.ts 파일을 제외시킨다는 의미입니다. 위 TSConfig 설정대로 tsc를 실행시킨 결과는 다음과 같습니다.
exclude에 파일을 명시할 때 주의할 점은, 컴파일에서 제외될 파일(exclude 옵션에 명시된 파일)이 컴파일에 포함될 파일(include 옵션에 명시된 파일)에서 사용될때 컴파일러는 exclude에 명시했더라도 해당 파일을 컴파일 시킵니다.
1
2
3
4
{
  "include": ["./main.ts", "./src/**/*.ts"],
  "exclude": ["./src/**/DummyComp.ts"]
}
1
2
// Comp1.ts
import "./DummyComp";
위 예시는 DummyComp를 컴파일에서 제외하게끔 설정한 TSConfig 파일과, 해당 파일을 컴파일 대상인 Comp1.ts 파일에 import 시킨 코드 입니다. 컴파일 결과는 다음과 같습니다.
DummyComp.ts 파일이 Comp1.ts에 사용되었기 때문에 컴파일 된것을 볼 수 있습니다.
👨💻 extends
다른 TSConfig 파일을 상속하기 위해 사용되는 옵션입니다. 상속 받을 TSConfig 옵션을 리스트에 명시해줍니다.
상속을 받을 시, 객체는 병합되며, 배열은 대체됩니다.
1
2
3
4
5
6
7
8
9
10
11
//tsconfig.json
{
  "include": ["./main.ts", "./src"],
  "exclude": ["./src/**/DummyComp.ts"],
  "compilerOptions": {
    "outDir": "./dist",
    "paths": {
      "modules/*": ["./src/*"]
    }
  }
}
1
2
3
4
5
6
7
8
9
10
//tsconfig.prod.json
{
  "extends": "./tsconfig.json",
  "compilerOptions": {
    "outDir": "dist_prod",
    "paths": {
      "modules/*": ["node_modules/*"]
    }
  }
}
위 예시에서 tsconfig.prod.json 은 tsconfig.json 을 상속받고 있습니다. 아래는 tsc --showConfig --project tsconfig.prod.json 명령어로 tsconfig.prod.json 의 옵션 값들을 살펴본 결과 입니다.
1
2
3
4
5
6
7
8
9
10
11
12
13
14
15
16
{
  "compilerOptions": {
    "outDir": "./dist_prod",
    "baseUrl": "./",
    "paths": {
      "modules/*": ["node_modules/*"]
    }
  },
  "files": [
    "./main.ts",
    "./src/components/Comp1.ts",
    "./src/components/Comp2.ts"
  ],
  "include": ["./main.ts", "./src"],
  "exclude": ["./src/**/DummyComp.ts"]
}
baseURL 옵션은 병합되었으나, paths 옵션의 modules/* 배열은 대체되었음을 알 수 있습니다.
💻 Compiler Option
👨💻 Language and Environment
1️⃣ target
Default:ES3
TypeScript 파일을 JavaScript로 컴파일 할 때, 어떤 버전으로 변환할지를 결정하는 옵션입니다.
다음과 같은 코드가 있다고 가정해 보겠습니다.
1
2
3
4
// Comp1.ts
export const helloWorld = (name: string) => {
  return `Hello ${name}`;
};
위 코드를 각각 target: ES3, target: ES6로 컴파일한 결과는 아래와 같습니다.
1
2
3
4
5
6
7
8
// Comp1.js (target: ES3)
"use strict";
exports.__esModule = true;
exports.helloWorld = void 0;
var helloWorld = function (name) {
  return "Hello ".concat(name);
};
exports.helloWorld = helloWorld;
1
2
3
4
// Comp1.js (target: ES6)
export const helloWorld = (name) => {
  return `Hello ${name}`;
};
TypeScript 파일에서는 const, arrow function, template literal이 사용되었습니다. 이 기능들은 ES3에는 지원되지 않기 때문에 컴파일시에 ES3에서 동작하는 함수들로 대체되었음을 알 수 있습니다. 반면에 target 옵션을 ES6로 설정한 경우, Comp1.ts의 모든 기능들이 정상동작 하기 때문에 컴파일된 결과가 원본 파일과 같습니다.
한가지 유의할 점은 TypeScript Compiler는 폴리필의 도구가 아니라는 점입니다. 즉 모든 코드를 target에 맞게 변환하지는 않습니다.
1
2
3
4
// Comp1.ts
const myPromise = new Promise((resolve) => {
  resolve(true);
});
1
2
3
4
// Comp1.js (ES3)
var myPromise = new Promise(function (resolve) {
  resolve(true);
});
위 예시는 Promise를 사용한 TypeScript 파일을 target: ES3로 컴파일한 결과를 나타낸 것 입니다.
Promise는 ES6 이후 버전에서만 동작하는 기능입니다. 따라서 ES3에서 동작하는 기능들로 대체되어야 합니다. 하지만 const, arrow function만 대체되고 Promise는 변경되지 않았음을 알 수 있습니다. ES3와 완벽히 호환되도록 변경하려면 babel과 같은 폴리필 도구를 사용해야 합니다.
❗️ target 옵션이 ES5 이하일때 Promise를 사용하면 아래와 같은 오류가 발생합니다. 
이는 ES5이하의 버전이 Promise를 지원하지 않아 올바른 타입을 가져올 수 없어 발생하는 오류 입니다. 이 오류를 해결하려면 아래에서 살펴볼 lib 옵션을 수정해야 합니다.
2️⃣ lib
TypeScript를 설치하면 lib 디렉토리에 JavaScript에 내장된 함수들의 type definition file들이 있습니다. lib 옵션은 TypeScript의 lib 부터 가져올 type definition file들의 목록입니다. 해당 옵션은 target의 값에 따라 자동으로 설정됩니다.
target 옵션에서 언급했던 Promise와 관련된 오류 메세지를 살펴보면, lib 옵션을 ES6 이상으로 높이라는 문구가 있습니다. 이는 target이 ES5 이하로 설정될 경우 지정되는 lib 목록에 Promise와 관련된 type definition file이 없기 때문입니다. 따라서 아래와 같이 lib 옵션을 설정해 주어야 합니다.
1
2
3
4
5
6
7
8
9
{
  "include": ["./main.ts", "./src"],
  "exclude": ["./src/**/DummyComp.ts"],
  "compilerOptions": {
    "outDir": "./dist",
    "target": "ES5",
    "lib": ["ES5", "ES2015.Promise"]
  }
}
보통의 경우는 target에 따라 설정된 lib 목록을 쓰는것이 좋지만, 다음의 경우에 직접 설정해야 합니다.
TypeScript프로젝트가 브라우저에서 동작하지 않아domtype definition file이 필요 없는 경우 (lib옵션이 명시되지 않으면 항상 제공 됨)JavaScript의 특정 기능이 폴리필을 통해 런타임에서 동작할 수 있지만,target에 설정된 버전에는 지원되지 않는 경우 (이때 올바른 런타임 폴리필이 모두 제공되어야 함)
❗️ 만약 어떤 type definition file도 포함 시키고 싶지 않다면, noLib 옵션을 true로 설정하면 됩니다.
🖊 target vs lib
target옵션과lib옵션 모두 값이 될 수 있는 후보들이 유사합니다. 하지만target은 현재 코드를 변경하는 것에 관여하는 옵션이고,lib는 내장된JavaScriptAPI의 타입을 제공하는데 관여하는 옵션이라는 점에서 차이가 있습니다.
👨💻 Emit
1️⃣ outDir
TypeScript Compiler(tsc)에 의해 생성된 파일들 (.js, .d.ts, .js.map …)이 위치할 디렉토리를 설정하는 옵션입니다. outDir가 따로 설정되지 않으면 기본값은 아래에서 살펴볼 rootDir가 됩니다.
지정된 디렉토리 하위의 파일 구조는 원본 파일의 구조와 동일하게 적용됩니다.
1
2
3
4
5
6
7
{
  "include": ["./main.ts", "./src/**/*.ts"],
  "exclude": ["./src/**/DummyComp.ts"],
  "compilerOptions": {
    "outDir": "./dist"
  }
}
위와 같이 TSConfig 설정에 outDir를 지정해주면 아래와 같은 결과가 나옵니다.
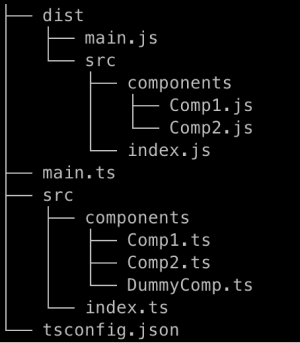
dist 디렉토리에 컴파일된 결과물이 저장되어있으며, 원본 파일의 디렉토리 구조와 동일한 구조로 생성되었음을 확인할 수 있습니다.
2️⃣ outFile
outFile 옵션을 설정하게 되면, 모든 컴파일된 파일이 하나의 파일로 합쳐지게 됩니다. 이때 outFile은 하나로 합쳐진 파일이 위치할 경로를 나타냅니다.
1
2
3
4
5
6
7
{
  "include": ["./**/*.ts"],
  "compilerOptions": {
    "module": "AMD",
    "outFile": "./dist/bundle.js"
  }
}
위와 같은 TSConfig로 tsc 명령어를 실행하면, /dist 경로에 컴파일된 파일들이 하나로 합쳐진 bundle.js 파일이 생성됩니다.
1
2
3
4
5
6
// a.ts
export const valueOfPi = Math.PI;

// b.ts
import { valueOfPi } from "./a.js";
export const twoPi = valueOfPi * 2;
1
2
3
4
5
6
7
8
9
10
11
12
13
// dist/bundle.js
define("a", ["require", "exports"], function (require, exports) {
  "use strict";
  Object.defineProperty(exports, "__esModule", { value: true });
  exports.valueOfPi = void 0;
  exports.valueOfPi = Math.PI;
});
define("b", ["require", "exports", "a"], function (require, exports, a_js_1) {
  "use strict";
  Object.defineProperty(exports, "__esModule", { value: true });
  exports.twoPi = void 0;
  exports.twoPi = a_js_1.valueOfPi * 2;
});
🖊 outFile과 module의 상관관계
outFile은module이None,System,AMD중 하나 일때만 지정할 수 있습니다.
CommonJS나,ES6로 설정되었을 때,outFile을 지정할 수 없는 이유는 임포트되는 파일의 경로때문입니다.a.js파일에./somePath/b.js를 임포트 한다고 가정해보겠습니다.
만약a.js와b.js가 하나의 파일로 합쳐지게되면a.js에서 사용하는b.js의 상대경로는 일치하지 않게되어 사용할 수가 없게됩니다.
3️⃣ removeComments
Default: false
해당 옵션을 true로 설정한다면, 컴파일된 파일에서 주석이 모두 제거됩니다.
4️⃣ sourceMap
Default: false
sourcemap이란 원본 코드(original code)와 원본 코드를 컴파일한 코드를 맵핑 시켜주는 파일로 .map 확장자를 가지고 있습니다. sourcemap이 있으면, 디버깅에 유리합니다.
1
2
3
4
5
6
7
8
{
  "include": ["./main.ts", "./src"],
  "exclude": ["./src/**/DummyComp.ts"],
  "compilerOptions": {
    "outDir": "./dist",
    "sourceMap": true
  }
}
TSConfig 속성중 sourceMap를 true로 설정하면 컴파일 결과물에 sourceMap 파일이 함께 생성됩니다.

위의 결과를 보면, 컴파일된 모든 파일에 sourcemap 파일이 생성된 것을 볼 수 있습니다. sourcemap파일은 컴파일된 JavaScript파일에 인접하게 생성되며, 같은 이름을 갖습니다.
sourcemap 파일이 생성되면 컴파일된 JavaScript 파일 하단에 아래와 같은 주석이 추가됩니다.
1
2
3
4
5
// Comp1.js

// code snippet..

//# sourceMappingURL=Comp1.js.map
해당 주석을 통해, 디버깅시에 브라우저가 Comp1.js.map 파일을 로드합니다.
🖊 sourcemap 파일의 property
sourcemap파일은 아래와 같은 구조를 갖습니다.
여기서
fileproperty는 컴파일된 파일중, 해당sourcemap파일과 연관되어있는 파일을 의미합니다.sourcesproperty는 원본 파일의 경로를 의미하며,mapping는 원본 코드와 컴파일된 코드 사이의 맵핑 정보를Base64로 인코딩한 값을 가지고 있습니다.
5️⃣ mapRoot
디버거가 sourcemap 파일을 가져올 위치를 지정하는 옵션입니다.
sourcemap 파일은 컴파일된 JavaScript 와 같은 위치에 생성되지만, 이 파일들을 https://my-website.com/debug/sourcemaps/ 이라는 가상의 도메인에 위치시킨다고 가정해보겠습니다.
이 상황에서 올바른 sourcemap 파일을 불러오기 위해서는 컴파일된 JavaScript 파일 하단의 sourceMappingURL을 아래와 같이 변경해야 합니다.
1
2
3
4
5
// Comp1.js

// ...code snippet

//# sourceMappingURL=https://my-website.com/debug/sourcemaps/Comp1.js.map
mapRoot의 값을 https://my-website.com/debug/sourcemaps/로 설정하면, sourcemap 파일의 위치가 자동으로 위와 같이 설정됩니다.
1
2
3
4
5
6
7
8
9
{
  "include": ["./main.ts", "./src"],
  "exclude": ["./src/**/DummyComp.ts"],
  "compilerOptions": {
    "outDir": "./dist",
    "sourceMap": true,
    "mapRoot": "https://my-website.com/debug/sourcemaps/"
  }
}
mapRoot를 설정할때 주의할 점은, sourcemap 파일이 생성될 위치를 결정하는 것이 아니라 불러올 위치를 결정한다는 점입니다.
6️⃣ inlineSourceMap
sourceMap 옵션 대신 해당 옵션을 true로 설정할 경우, sourcemap 파일이 따로 생성되지 않고 컴파일된 JavaScript 파일 내부로 임베딩(embedding) 됩니다.
1
2
3
4
5
6
7
8
{
  "include": ["./main.ts", "./src"],
  "exclude": ["./src/**/DummyComp.ts"],
  "compilerOptions": {
    "outDir": "./dist",
    "inlineSourceMap": true
  }
}
위의 TSConfig로 tsc 명령어를 실행시키면 아래와 같은 결과가 나옵니다.
1
2
3
4
5
"use strict";
exports.__esModule = true;
exports.name = void 0;
exports.name = "John";
//# sourceMappingURL=data:application/json;base64,eyJ2ZXJzaW9uIjozLCJmaWxlIjoiQ29tcDEuanMiLCJzb3VyY2VSb290IjoiIiwic291cmNlcyI6WyIuLi8uLi8uLi9zcmMvY29tcG9uZW50cy9Db21wMS50cyJdLCJuYW1lcyI6W10sIm1hcHBpbmdzIjoiOzs7QUFBYSxRQUFBLElBQUksR0FBRyxNQUFNLENBQUEifQ==
sourceMappingURL에 sourcemap 파일의 위치가 아니라, 맵핑 정보가 직접 들어가 있는것을 알 수 있습니다.
inlineSourceMap을 적용한 경우 JavaScript 파일의 크기가 커진다는 단점이 있지만, sourcemap 파일을 불러올 수 없는 환경에서 유리하다는 장점이 있습니다.
7️⃣ sourceRoot
디버거가 원본 파일을 가져올 위치를 지정하는 옵션입니다.
해당 옵션을 설정하면, sourcemap 파일의 sourceRoot property의 값이 변경됩니다.
1
2
3
4
5
6
7
8
9
{
  "include": ["./main.ts", "./src"],
  "exclude": ["./src/**/DummyComp.ts"],
  "compilerOptions": {
    "outDir": "./dist",
    "sourceMap": true,
    "sourceRoot": "https://my-website.com/debug/source/"
  }
}
위와 같은 TSConfig 설정으로 생성된 sourcemap 파일은 아래와 같습니다.
1
2
3
4
5
6
7
8
9
10
11
// Comp1.js.map
{
  "version": 3,
  "file": "Comp1.js",
  "sourceRoot": "https://my-website.com/debug/source/",
  "sources": [
    "src/components/Comp1.ts"
  ],
  "names": [],
  "mappings": ";;;AAAa,QAAA,IAAI,GAAG,MAAM,CAAA"
}
sourceRoot가 TSConfig에서 설정한 값으로 변경되었고, sources의 경로가 변경되었을을 알 수 있습니다. 따라서 디버거는 https://my-website.com/debug/source/src/components/Comp1.ts에서 원본파일을 가져오게 됩니다.
8️⃣ inlineSources
해당옵션이 true로 설정되면, TypeScript의 원본코드가 sourcemap 파일의 sourcesContents property로 들어가게 됩니다.
sourcemap 파일의 sources property에 명시되어 있는 파일들은, 디버깅시에 필요할때마다(on-demand) 불러오게 됩니다. 원본코드를 sourcemap 파일에 임베딩시키면, 따로 불러오지 않아도 됩니다.
1
2
3
4
5
6
7
8
9
{
  "include": ["./main.ts", "./src"],
  "exclude": ["./src/**/DummyComp.ts"],
  "compilerOptions": {
    "outDir": "./dist",
    "sourceMap": true,
    "inlineSources": true
  }
}
위 옵션으로 생성된 sourcemap 파일은 아래와 같습니다.
1
2
3
4
5
6
7
8
9
10
11
12
13
14
// Comp1.js.map
{
  "version": 3,
  "file": "Comp1.js",
  "sourceRoot": "",
  "sources": [
    "../../../src/components/Comp1.ts"
  ],
  "names": [],
  "mappings": ";;;AAAa,QAAA,IAAI,GAAG,MAAM,CAAA",
  "sourcesContent": [
    "export const name = \"John\"\n\n"
  ]
}
Comp1.ts 파일의 코드가 sourcesContents에 포함되었음을 알 수 있습니다.
만약 inlineSourceMap 옵션이 true 경우는, sourcesContent가 포함된 상태에서 Base64로 인코딩되어 JavaScript 파일에 임베딩 됩니다.
9️⃣ declaration
Default: true if composite; false otherwise
true로 설정될 경우, 컴파일 결과물로 type definition file (type declaration file)이 생성됩니다.
1
2
3
4
5
6
7
8
{
  "include": ["./main.ts", "./src"],
  "exclude": ["./src/**/DummyComp.ts"],
  "compilerOptions": {
    "outDir": "./dist",
    "declaration": true
  }
}
위 TSConfig로 tsc 명령어를 실행하면 아래와 같은 결과가 나옵니다.

JavaScript 파일외에 .d.ts 파일도 함께 생성되었음을 알 수 있습니다.
1
2
3
4
5
6
7
8
9
10
11
12
13
14
15
16
// Comp1.ts
export const helloWorld = (name: string) => {
  return `Hello ${name}`;
};

// Comp1.js
("use strict");
exports.__esModule = true;
exports.helloWorld = void 0;
var helloWorld = function (name) {
  return "Hello ".concat(name);
};
exports.helloWorld = helloWorld;

// Comp1.d.ts
export declare const helloWorld: (name: string) => string;
Comp1.ts로 부터 컴파일된 type definition file에는 원본 파일에 적용된 타입들이 정의되어 있습니다.
🔟 declarationDir
type definition file이 생성될 디렉토리의 경로를 설정하는 옵션입니다.
위의 declaration 옵션에서 살펴보았듯이, declaration이 true이고 declarationDir가 명시되어있지 않으면, type definition file은 JavaScript 파일이 생성된 곳에 만들어집니다.
1
2
3
4
5
6
7
8
{
  "include": ["./main.ts", "./src"],
  "exclude": ["./src/**/DummyComp.ts"],
  "compilerOptions": {
    "outDir": "./dist",
    "declarationDir": "./dist/types"
  }
}

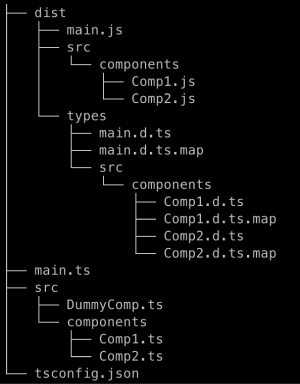
declarationDir에 명시된 경로에 type definition file이 생성된것을 볼 수 있습니다.
1️⃣1️⃣ declarationMap
type definition file에 대한 sourcemap 파일을 생성하도록 하는 옵션입니다.
생성된 sourcemap은 원본 TypeScript파일과 type definition file을 연결해 줍니다.
1
2
3
4
5
6
7
8
9
10
{
  "include": ["./main.ts", "./src"],
  "exclude": ["./src/**/DummyComp.ts"],
  "compilerOptions": {
    "outDir": "./dist",
    "declaration": true,
    "declarationDir": "./dist/types",
    "declarationMap": true
  }
}
위의 TSConfig 파일로 tsc 명령어를 실행시키면 아래와 같이 .d.ts 파일이 생성된 곳에 sourcemap 파일이 생성된 것을 알 수 있습니다.
type definition file의 sourcemap은 IDE에서 .d.ts 파일에 정의되어 있는 타입을 눌렀을 경우 (VSCode에서는 go to definition) 원본 TypeScript 파일로 이동할 수 있게 만들어 줍니다.
1️⃣2️⃣ downlevelIteration
Default: false
ES6에 추가된 반복문(for/of, Array spread([a, ...b]), argument spread(fn(...args)), Symbol.iterator)들을 ES5 환경에서 조금 더 정확하게 호환될 수 있도록 해주는 옵션입니다.
Downleveling이란 오래된JavaScript버전으로 변경하는것을 의미합니다.
1
2
3
4
5
// Comp1.ts
const str = "Hello";
for (const s of str) {
  console.log(s);
}
ES6 스펙인 for/of를 사용한 코드를 각각 target: ES6, target: ES5로 컴파일 해보겠습니다.
1
2
3
4
5
6
// Comp1.js (target: ES6)

const str = "Hello";
for (const s of str) {
  console.log(s);
}
1
2
3
4
5
6
// Comp1.js (target: ES5)
var str = "Hello";
for (var _i = 0, str_1 = str; _i < str_1.length; _i++) {
  var s = str_1[_i];
  console.log(s);
}
❗️ target 옵션을 ES5로만 지정할 경우, tsc를 실행하게되면 오류가 발생합니다. for/of는 ES5에 정의되어 있지 않기때문입니다. 따라서 lib옵션에 ES6를 추가해야 정상적으로 동작합니다. (위 코드의 경우 console이 있기때문에 DOM도 추가해야합니다.)
ES5로 컴파일한 결과물을 확인해 보면, 일반적인 반복문을 사용한 것을 볼 수 있습니다. for/of 반복문이 완벽히 대치된 것처럼 보이지만 유니코드 구성된 문자열(이모티콘)의 경우 다른 결과가 나오게 됩니다.
downlevelIteration 옵션을 true로 설정하게 되면, ES6에 추가된 반복문들을 Symbol.iterator가 지원되는 환경에서는 Symbol.iterator를 사용하여 변환하고 그렇지 않은 환경에서는 일반적인 반복문으로 변환합니다.
1
2
3
4
5
6
7
8
9
10
{
  "include": ["./main.ts", "./src"],
  "exclude": ["./src/**/DummyComp.ts"],
  "compilerOptions": {
    "outDir": "./dist",
    "target": "ES5",
    "lib": ["ES6", "DOM"],
    "downlevelIteration": true
  }
}
위의 TSConfig로 tsc 명령어를 실행하여 얻은 JavaScript 파일에는 Symbol.iterator의 구현 여부를 확인하는 헬퍼함수가 있습니다.
1
2
3
4
5
6
7
8
9
10
11
12
13
14
15
16
17
18
19
20
21
22
23
24
25
26
27
28
29
30
31
32
33
34
35
36
37
38
39
// Comp1.js
var __values =
  (this && this.__values) ||
  function (o) {
    var s = typeof Symbol === "function" && Symbol.iterator,
      m = s && o[s],
      i = 0;
    if (m) return m.call(o);
    if (o && typeof o.length === "number")
      return {
        next: function () {
          if (o && i >= o.length) o = void 0;
          return { value: o && o[i++], done: !o };
        },
      };
    throw new TypeError(
      s ? "Object is not iterable." : "Symbol.iterator is not defined."
    );
  };
var e_1, _a;
var str = "Hello";
try {
  for (
    var str_1 = __values(str), str_1_1 = str_1.next();
    !str_1_1.done;
    str_1_1 = str_1.next()
  ) {
    var s = str_1_1.value;
    console.log(s);
  }
} catch (e_1_1) {
  e_1 = { error: e_1_1 };
} finally {
  try {
    if (str_1_1 && !str_1_1.done && (_a = str_1.return)) _a.call(str_1);
  } finally {
    if (e_1) throw e_1.error;
  }
}
1️⃣3️⃣ importHelpers
Default: false
TypeScript가 downlevel을 수행한 컴파일 결과물에는 __로 시작하는 헬퍼함수가 있을 수 있습니다.
downlevelIteration 옵션에서 살펴보았듯이, for/of를 대체하기 위해 __values라는 헬퍼함수가 사용되었습니다. 이 헬퍼함수는 for/of가 사용된 모든 코드들에 추가됩니다.
1
2
3
4
5
6
7
8
9
10
11
12
13
// Comp1.ts
export const str1 = "Hello";

for (const s1 of str1) {
  console.log(s1);
}

// Comp2.ts
export const str2 = "Hi";

for (const s2 of str2) {
  console.log(s2);
}
위 코드를 downlevelIteration: true 옵션을 설정하여 컴파일한 결과물 모두 __values 헬퍼함수가 추가되었음을 알 수 있습니다.
1
2
3
4
5
6
7
8
9
10
11
12
13
// Comp1.js
var __values =
  (this && this.__values) ||
  function (o) {
    // ..
  };

// Comp2.js
var __values =
  (this && this.__values) ||
  function (o) {
    // ..
  };
이는 모듈간의 코드 중복을 야기합니다.
이 현상을 막기위해 Typescript 진영은 tslib라는 패키지를 제공합니다. 이 패키지는 downleveling 시 사용될 수 있는 모든 헬퍼함수를 포함하고 있는 패키지 입니다.
1
2
3
4
5
6
7
8
9
10
11
{
  "include": ["./main.ts", "./src"],
  "exclude": ["./src/**/DummyComp.ts"],
  "compilerOptions": {
    "outDir": "./dist",
    "target": "ES5",
    "lib": ["ES6", "DOM"],
    "downlevelIteration": true,
    "importHelpers": true
  }
}
tslib 패키지를 설치한 후, 위와 같이 importHelper를 true로 지정하면, 설정된 모듈 시스템으로 헬퍼함수를 tslib에서 가져옵니다.
1
2
3
4
5
6
7
8
9
10
11
12
13
14
15
16
17
18
19
20
21
22
23
24
25
// Comp1.js
"use strict";
var e_1, _a;
Object.defineProperty(exports, "__esModule", { value: true });
exports.str1 = void 0;
var tslib_1 = require("tslib");
exports.str1 = "Hello";
try {
  for (
    var str1_1 = tslib_1.__values(exports.str1), str1_1_1 = str1_1.next();
    !str1_1_1.done;
    str1_1_1 = str1_1.next()
  ) {
    var s1 = str1_1_1.value;
    console.log(s1);
  }
} catch (e_1_1) {
  e_1 = { error: e_1_1 };
} finally {
  try {
    if (str1_1_1 && !str1_1_1.done && (_a = str1_1.return)) _a.call(str1_1);
  } finally {
    if (e_1) throw e_1.error;
  }
}
CommonJS 모듈 시스템으로 __values 헬퍼함수를 tslib으로 부터 가져왔음을 알 수 있습니다.
한가지 유의할 점은 적용될 파일이 script 파일이 아닌, module 파일이여야 한다는 것 입니다.
1️⃣4️⃣ noEmitHelpers
Default: false
importHelpers 옵션을 true로 설정할때의 단점은, tslib 패키지를 사용하기위해서 모듈 시스템을 구현해야한다는 것입니다. 즉 파일이 script 파일이 아니라, module이여야만 해당 옵션이 적용됩니다.
noEmitHelpers는 헬퍼함수를 컴파일된 결과물에 추가하지 않는다는 점이 ``noEmitHelpers와 유사하지만, 파일이 module이 아니여도 가능한 점과 tslib`으로 부터 함수들을 가져오지 않는다는 점이 다릅니다.
1
2
3
4
5
6
// Comp1.ts
const str1 = "Hello";

for (const s1 of str1) {
  console.log(s1);
}
1
2
3
4
5
6
7
8
9
10
11
{
  "include": ["./main.ts", "./src"],
  "exclude": ["./src/**/DummyComp.ts"],
  "compilerOptions": {
    "outDir": "./dist",
    "target": "ES5",
    "lib": ["ES6", "DOM"],
    "downlevelIteration": true,
    "noEmitHelpers": true
  }
}
위의 TSConfig 옵션으로 컴파일한 결과는 다음과 같습니다.
1
2
3
4
5
6
7
8
9
10
11
12
13
14
15
16
17
18
19
20
var e_1, _a;
var str1 = "Hello";
try {
  for (
    var str1_1 = __values(str1), str1_1_1 = str1_1.next();
    !str1_1_1.done;
    str1_1_1 = str1_1.next()
  ) {
    var s1 = str1_1_1.value;
    console.log(s1);
  }
} catch (e_1_1) {
  e_1 = { error: e_1_1 };
} finally {
  try {
    if (str1_1_1 && !str1_1_1.done && (_a = str1_1.return)) _a.call(str1_1);
  } finally {
    if (e_1) throw e_1.error;
  }
}
__values 헬퍼함수의 구현이 생략되었음을 볼 수 있습니다. 또한 importHelpers 옵션을 true로 설정했을때 처럼, tslib를 임포트하지 않았습니다. 따라서 헬퍼함수를 사용자가 직접 구현하거나 전역으로 설정할 수 있습니다.
👨💻 Modules
1️⃣ rootDir
Default: 컴파일이 대상인 파일들 중 선언파일(declare) 파일을 제외한 파일들의 가장 긴 공통 경로(longest common path)
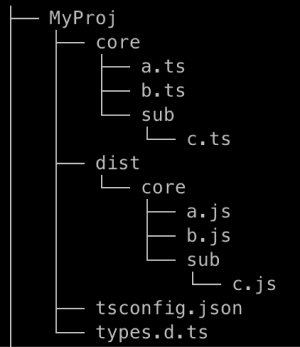
아래와 같은 구조를 가진 프로젝트를 예시로 들어보겠습니다.

위 예시에서 컴파일되는 파일들의(a.ts, b.ts, c.ts) 가장 긴 공통 경로는 /MyProj/core/ 입니다. 따라서 rootDir가 TSConfig 파일에 명시되지 않으면 rootDir의 값은 /MyProj/core (./core)가 됩니다.
tsc가 컴파일된 결과물의 위치를 결정하는 방법은, rootDir, outDir의 옵션이 설정되지 않았을 때의 경로에서 rootDir의 경로를 제거한 후 outDir 경로를 붙여 결과물들의 위치를 결정합니다. 아래의 예시를 통해 살펴보겠습니다.
1
2
3
{
  "include": ["./core/**/*.ts"]
}
위와 같은 TSConfig 설정으로 tsc 명령어를 실행할 경우 a.ts의 컴파일된 파일의 경로는 /MyProj/core/a.js 입니다. 이때, rootDir와 outDir가 설정되지 않았기 때문에 모두 기본값 (/MyProj/core/)로 설정됩니다. 따라서 /MyProj/core/a.js 경로에 rootDir 경로를 제거하고 (a.js), outDir 경로를 추가한(/MyProj/core/a.js) 경로가 최종적인 위치가 됩니다.
1
2
3
4
5
6
{
  "include": ["./core/**/*.ts"],
  "compileOptions": {
    "outDir": "./dist"
  }
}
위와 같은 설정에서 rootDir는 /MyProj/core, outDir는 /MyProj/dist/가 되기때문에, a.ts를 컴파일한 파일의 최종적인 위치는 위에서 설명한 과정을 거쳐 /MyProj/dist/a.js가 됩니다.
이제 아래 예시처럼 rootDir를 직접 설정해보겠습니다.
1
2
3
4
5
6
7
{
  "include": ["./core/**/*.ts"],
  "compileOptions": {
    "rootDir": "./",
    "outDir": "./dist"
  }
}
위 설정에서 rootDir의 경로는 /MyProj/가 됩니다. 따라서 a.ts의 경로에서 rootDir를 제거(core/a.js)한 후, outDir의 경로를 추가한 경로는 /MyProj/dist/core/a.js가 됩니다.
🖊 rootDir 설정시 주의사항
rootDir를 설정할때 조심해야할 점은, 컴파일에 포함될 파일들을 모두 포함하는 경로를 설정해주어야 합니다.
2️⃣ module
Default: CommonJS if target is ES3 or ES5; ES6/ES2015 otherwise
module 옵션은 컴파일 시에 사용할 모듈 시스템을 지정합니다.
TypeScript는 모듈을 불러오거나 내보낼때, import/export 선언문을 사용합니다. 이 문법은 CommonJS를 사용하는 환경이나, Require.js를 기반으로 한 AMD에서는 동작하지 않습니다. 따라서 TypeScript를 컴파일할 때, 각 환경에서 정상 동작하는 모듈 시스템을 적용해 import/export 선언문을 변경해야 합니다.
아래는 TypeScript 파일을 각 환경별로 module 옵션을 적용하여 컴파일한 파일들의 예시입니다.
1
2
3
4
5
6
// a.ts
export const valueOfPi = Math.PI;

// b.ts
import { valueOfPi } from "./a";
export const twoPi = valueOfPi * 2;
- CommonJS
1
2
3
4
5
6
7
{
  "include": ["./core/**/*.ts"],
  "compilerOptions": {
    "outDir": "./dist",
    "module": "CommonJS"
  }
}
1
2
3
4
5
6
7
8
9
10
11
12
// a.js
"use strict";
Object.defineProperty(exports, "__esModule", { value: true });
exports.valueOfPi = void 0;
exports.valueOfPi = Math.PI;

// b.js
("use strict");
Object.defineProperty(exports, "__esModule", { value: true });
exports.twoPi = void 0;
var a_1 = require("./a");
exports.twoPi = a_1.valueOfPi * 2;
- AMD
1
2
3
4
5
{
  "compileOptions": {
    "module": "AMD"
  }
}
1
2
3
4
5
6
7
8
9
10
11
12
13
14
15
// a.js
define(["require", "exports"], function (require, exports) {
  "use strict";
  Object.defineProperty(exports, "__esModule", { value: true });
  exports.valueOfPi = void 0;
  exports.valueOfPi = Math.PI;
});

// b.js
define(["require", "exports", "./a"], function (require, exports, a_1) {
  "use strict";
  Object.defineProperty(exports, "__esModule", { value: true });
  exports.twoPi = void 0;
  exports.twoPi = a_1.valueOfPi * 2;
});
- UMD
1
2
3
4
5
{
  "compileOptions": {
    "module": "UMD"
  }
}
1
2
3
4
5
6
7
8
9
10
11
12
13
14
15
16
17
18
19
20
21
22
23
24
25
26
27
28
29
30
// a.js
(function (factory) {
  if (typeof module === "object" && typeof module.exports === "object") {
    var v = factory(require, exports);
    if (v !== undefined) module.exports = v;
  } else if (typeof define === "function" && define.amd) {
    define(["require", "exports"], factory);
  }
})(function (require, exports) {
  "use strict";
  Object.defineProperty(exports, "__esModule", { value: true });
  exports.valueOfPi = void 0;
  exports.valueOfPi = Math.PI;
});

// b.js
(function (factory) {
  if (typeof module === "object" && typeof module.exports === "object") {
    var v = factory(require, exports);
    if (v !== undefined) module.exports = v;
  } else if (typeof define === "function" && define.amd) {
    define(["require", "exports", "./a"], factory);
  }
})(function (require, exports) {
  "use strict";
  Object.defineProperty(exports, "__esModule", { value: true });
  exports.twoPi = void 0;
  var a_1 = require("./a");
  exports.twoPi = a_1.valueOfPi * 2;
});
node16/nodenext
TypeScript버전4.7이상 부터 사용할 수 있는module옵션입니다. 해당 옵션은Node의native ECMAScript Module support와 통합되었습니다. 따라서 컴파일된 파일의 모듈 시스템이CommonJS인지ES2020인지를 결정하는 것은 파일의 확장자나package.json의type필드 값입니다.package.json의type값으로CommonJS와Module두 값이 올 수 있으며, 지정되지 않았을 때는CommonJS로 설정됩니다. 만약type이module일 경우는import/export구문에 확장자를 붙여야 합니다.확장자를 지정해 모듈 시스템을 결정할 수도 있습니다.
.mts는type을Module로 지정한 것과 같은 결과를 냅니다..mts는.mjs로 컴파일 되며 아래와 같은 결과가 나오게 됩니다.1 2 3 4 5 6
//a.mts export const valueOfPi = Math.PI; // b.mts import { valueOfPi } from "./a.mjs"; export const twoPi = valueOfPi * 2;
1
2
3
4
5
6
// a.mjs;
export const valueOfPi = Math.PI;

// b.mjs
import { valueOfPi } from "./a.mjs";
export const twoPi = valueOfPi * 2;
.cts는type을CommonJS로 설정한것과 같은 결과를 내며 아래와 같습니다.1 2 3 4 5 6
//a.cts export const valueOfPi = Math.PI; // b.cts import { valueOfPi } from "./a.cjs"; export const twoPi = valueOfPi * 2;
1
2
3
4
5
6
7
8
9
10
11
12
//a.cjs
"use strict";
Object.defineProperty(exports, "__esModule", { value: true });
exports.valueOfPi = void 0;
exports.valueOfPi = Math.PI;

//b.cjs
("use strict");
Object.defineProperty(exports, "__esModule", { value: true });
exports.twoPi = void 0;
const a_cjs_1 = require("./a.cjs");
exports.twoPi = a_cjs_1.valueOfPi * 2;
더 자세한 내용은 해당 문서에 서술되어 있습니다.
module의 기본값은 target 옵션에 영향을 받습니다. 만약 target이 ES3나 ES5인 경우 module의 값은 CommonJS이며, ES6(ES2015)보다 높을 경우 ES6로 설정됩니다. 추가적으로 module옵션은 moduleResolution에 영향을 끼칩니다.
3️⃣ typeRoots
typeRoots는 패키지의 type definition file들을 정의해놓은 경로를 설정하는 옵션입니다.
lodash는 JavaScript를 사용해 작성된 라이브러리 입니다. 따라서 API의 타입이 존재하지 않습니다. 이런 종류의 라이브러리를 TypeScript에서 사용하기 위한 두가지 방법이 존재합니다.
첫번째는 @types/[라이브러리 이름]의 이름을 가진 패키지를 설치하는 것입니다. 해당 이름을 가진 패키지들은 DefinitelyTypes 커뮤니티에서 만든 것으로 JavaScript로 작성된 라이브러리들의 타입을 정의해 모아 놓은 것 입니다. @types 패키지들은 node_modules 하위의 @types 디렉토리에 설치가 되며 이 경로는 typeRoots에 자동으로 추가됩니다.
두번째는 직접 정의하는 것입니다. DefinitelyTypes에 정의된 타입이 없는 라이브러리의 경우 직접 type definition file을 작성해야 합니다. typings/와 vendor/types 디렉토리에 타입이 없는 라이브러리들의 type definition file을 작성했다고 가정해보겠습니다.
1
2
3
4
5
6
7
8
{
  "include": ["./main.ts", "./src"],
  "exclude": ["./src/**/DummyComp.ts"],
  "compilerOptions": {
    "outDir": "./dist",
    "typeRoots": ["./typings", "./vendor/types"]
  }
}
위와 같이 TSConfig 옵션을 설정하면, 모든 패키지의 타입을 types/와 vendor/types에서 참조합니다.
❗️ typeRoots를 명시적으로 설정해주는 경우 node_modules/@types 디렉토리는 제외가 됩니다. 따라서 typeRoots에 반드시 추가해주어야 합니다.
4️⃣ types
types 옵션은 자동(전역)으로 타입을 임포트할 패키지들을 명시하는 옵션입니다.
TypeScript는 기본적으로 node_modules/@types 하위에 있는 모든 type definition file 들을 자동으로 임포트 합니다. 또한 node_module/@types가 ../node_module/@types, ../../node_module/@types 처럼 다른 곳에 있어도 마찬가지 입니다.
lodash를 예시로 들어보겠습니다.
아래의 코드는 lodash와 @types/lodash를 설치한 후 작성한 코드입니다.
1
2
// main.ts
const newObj = _.cloneDeep({ a: 1, b: { c: 2, d: 3 } });
types 옵션에 아무것도 지정하지 않은채, 위와 같은 코드를 입력하면 lodash를 임포트하지 않았음에도 타입에러가 발생하지 않습니다. 또한 아래처럼 IDE의 지원도 가능합니다.

물론, 패키지를 임포트한적이 없기 때문에 실제 실행시 오류가 발생합니다.
Node로 또 다른 예시를 살펴보겠습니다.
@types/node를 설치한 후 아래 코드를 작성하면 타입에러가 발생하지 않습니다.
1
2
// main.ts
console.log(process.env);
process의 경우는 Node에 전역으로 임포트되어 있기때문에 실행시 오류가 발생하지 않습니다.
이제 아래와 같이 types 옵션을 명시해보겠습니다.
1
2
3
4
5
6
7
8
{
  "include": ["./main.ts", "./src"],
  "exclude": ["./src/**/DummyComp.ts"],
  "compilerOptions": {
    "outDir": "./dist",
    "types": ["node"]
  }
}
types: ["node"]의 의미는 node_modules/@types/node를 제외한 node_module/@types 하위의 모든 패키지의 type definition file들을 자동으로 임포트 하지 않겠다는 것을 의미합니다. 따라서 lodash의 타입 역시 임포트 되지 않았기 때문에, 위의 lodash 예시코드를 입력해보면 타입에러가 발생합니다. 또한 IDE역시 타입을 추론하지 못합니다.
이는 Node도 마찬가지 입니다. types: ["lodash"]를 설정하게되면, process의 타입을 추론하지 못해 오류가 발생합니다.
❗️ types 옵션을 지정할때 주의할 점은, 해당 옵션은 패키지를 임포트 하는 방식에 영향을 끼치지 않는다는 것입니다.
다시말해 types 옵션에 lodash 패키지가 포함되지 않더라도, 아래의 코드와 같이 패키지를 직접 임포트하면 정상적인 타입추론과 IDE의 지원이 가능해집니다.
1
2
3
4
// main.ts
import * as _ from "lodash";

const newObj = _.cloneDeep({ a: 1, b: { c: 2, d: 3 } });
5️⃣ moduleResolution
TypeScript 프로젝트에서 패키지를 찾을 때 사용하는 알고리즘을 지정할 수 있는 옵션입니다.
6️⃣ resolveJsonModule
Default: false
TypeScript 프로젝트에 json 파일을 임포트할 수 있게해주는 옵션입니다.
해당 옵션을 설정해 주지 않고 아래와 같이 json 파일을 임포트할 경우 오류가 발생합니다.
1
import settings from "./settings.json";
error TS2732: Cannot find module ‘./settings.json’. Consider using ‘–resolveJsonModule’ to import module with ‘.json’ extension.
7️⃣ baseURL
비상대 경로(non-relative)로 모듈을 가져왔을때, 우선적으로 탐색할 디렉토리의 baseURL을 지정해주는 옵션입니다.
1
2
3
4
5
6
7
// Comp1.ts
export const helloWorld = "Hello Word";

// Comp2.ts
import { helloWorld } from "./Comp1";

console.log(helloWorld);
Comp2.ts는 Comp1.ts와 같은 디렉토리안에 위치하고 있기때문에 ./Comp1와 같은 상대경로로 파일을 임포트 할 수 있습니다.
만약 아래와 같이 비상대 경로로 Comp1.ts 파일을 임포트하게되면 오류가 발생합니다.
1
2
3
// Comp2.ts
import { helloWorld } from "src/components/Comp1";
console.log(helloWorld);
error TS2307: Cannot find module ‘src/components/Comp1’ or its corresponding type declarations.
비상대 경로로 모듈을 임포트하게되면, TypeScript는 node_modules에서 해당 모듈을 찾게되는데 node_modules에도 Comp1.ts는 존재하지 않기 때문입니다.
이 경우 baseURL을 지정하여 오류를 해결할 수 있습니다.
1
2
3
4
5
6
7
8
{
  "include": ["./main.ts", "./src"],
  "exclude": ["./src/**/DummyComp.ts"],
  "compilerOptions": {
    "outDir": "./dist",
    "baseUrl": "./"
  }
}
baseURL를 TSConfig의 위치와 동일하게 지정해주었기 때문에, 비상대 경로로 모듈을 임포트할 경우 TypeScript는 src 디렉토리를 먼저 탐색한 후 찾지 못하면 node_modules를 탐색합니다(node_modules보다 우선 순위 높음).
🖊 컴파일된 파일에서의 비상대 경로
비상대 경로들은 컴파일 한
JavaScript파일에서도 비상대 경로로 남아있게 됩니다.
위 코드를
Node환경에서 실행시킨다면Comp1.js모듈을 찾을 수 없어 오류가 발생합니다. 비상대 경로로 모듈을 임포트해node_modules를 우선적으로 탐색하기 때문입니다.
TypeScript는 런타임시에 모듈의 경로를 확인할 수 있는 수단이 있다고 가정하기 때문에, 컴파일시에 비상대 경로를 상대경로로 변환하지 않습니다. 따라서baseURL역할을 하는 경로를 직접 지정해 주어야 합니다.
Node환경에서는NODE_PATH를 설정해준 후 실행하게되면 정상동작합니다.
8️⃣ paths
baseURL이 설정된 경우 baseURL에 대한 상대경로로, 설정되지 않았을 경우 TSConfig를 기준으로 모듈들을 다시 매핑(re-map)하는데 사용되는 옵션입니다.
1
2
3
4
5
6
7
8
9
10
11
{
  "include": ["./main.ts", "./src"],
  "exclude": ["./src/**/DummyComp.ts"],
  "compilerOptions": {
    "outDir": "./dist",
    "baseUrl": "./",
    "paths": {
      "hello": ["./src/components/Comp1"]
    }
  }
}
위 TSConfig의 paths 옵션은 Comp1.ts을 hello란 이름으로 매핑시키겠다는 것을 의미합니다. 따라서 아래와 같이 임포트할 수 있습니다.
1
2
3
import { helloWorld } from "hello";

console.log(helloWorld);
디렉토리 구조가 복잡한 프로젝트에서 상대경로를 통해 모듈을 임포트할 경우, 임포트 구문이 복잡해질 수 있습니다(../../../../src/~). 이런 상황에서 paths 옵션을 통해 각 디렉토리들을 재 매핑하면 정리된 임포트 구문을 사용할 수 있습니다.
1
2
3
4
5
6
7
8
9
10
{
  "compilerOptions": {
    "paths": {
      "app/*": ["./src/app/*"],
      "config/*": ["./src/app/_config/*"],
      "environment/*": ["./src/environments/*"],
      "shared/*": ["./src/app/_shared/*"]
    }
  }
}
paths 옵션도 baseURL 옵션과 마찬가지로 비상대경로가 상대경로로 변환되지 않는 문제가 있습니다.
1
2
3
4
"use strict";
Object.defineProperty(exports, "__esModule", { value: true });
var hello_1 = require("hello");
console.log(hello_1.helloWorld);
위 코드를 Node 환경에서 실행하면, 아래와 같은 오류가 발생합니다.
Error: Cannot find module ‘hello’
baseURL 을 지정했을 때, 해당 오류를 해결하기 위해 런타임시에 NODE_PATH 를 지정해 주었지만 paths 옵션은 이 방법을 사용할 수 없습니다. hello 라는 모듈은 어디에도 존재하지 않기 때문입니다.
paths 옵션에서 이 오류를 해결하기 위한 방법은 많지만 대표적인 방법 두 가지를 살펴보겠습니다.
module-alias
첫 번째 방법은module_alias라는NPM패키지를 사용하는 것입니다. 해당 패키지를 사용하여package.json에TSConfig에서 설정한 매핑 정보를 설정해 주어야 합니다.1 2 3 4 5 6
{ "name": "js-playground", "_moduleAliases": { "hello": "./dist/src/components/Comp1.js" } }
위와 같이
_moduleAliases키에 맵핑 정보를 명시해준 후,module-alias/register.js를 메인 파일에서 다른 코드보다 먼저 실행시키거나,node -r module-alias/register를 실행해 주어야 합니다.tsconfig-paths
module-alias패키지를 사용하게 되면,package.json파일과TSConfig모두를 관리해야하는 단점이 있습니다.
tsconfig-paths패키지를 사용하게되면,paths옵션에 명시된 모듈 맵핑 정보만 관리하면 됩니다.
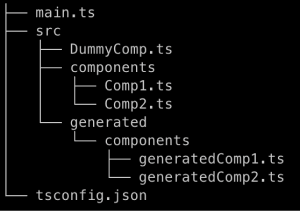
9️⃣ rootDirs
rootDir 옵션은 상대경로로 모듈을 임포트할 경우, 모듈들을 찾을 디렉토리들의 리스트를 지정하는 옵션입니다. 리스트에 명시된 경로들은 하나의 가상 디렉토리(virtual directory)를 형성합니다.
1
2
3
4
5
6
7
8
{
  "include": ["./main.ts", "./src"],
  "exclude": ["./src/**/DummyComp.ts"],
  "compilerOptions": {
    "outDir": "./dist",
    "rootDirs": ["./src/components", "./src/generated/components"]
  }
}
위와 같은 디렉토리 구조와 TSConfig 설정을 가진 프로젝트가 있다고 가정해 보겠습니다. rootDirs에 명시된 ./src/components 와 ./src/generated/components 는 하나의 경로로 간주됩니다. 따라서 아래와 같이 임포트할 수 있습니다.
1
2
// generatedComp1.ts
export const generatedComp1 = "This is Generated Comp1";
1
2
// Comp1.ts
import { generatedComp1 } from "./generatedComp1";
generatedComp1.ts 는 Comp1.ts 와 같은 위치에 존재하지 않음에도 ./generatedComp1 와 같이 임포트해도 오류가 발생하지 않음을 볼 수 있습니다.
👨💻 TypeChecking
1️⃣ strict
TypeScript로 코드를 작성할 때, true로 설정하는것이 권장되는 옵션입니다. 해당 옵션을 true로 설정할 경우 모든 strict mode와 연관된 옵션들(alwaysStrict, strictNullChecks, strictBindCallApply, strictFunctionTypes, strictPropertyInitialization, noImplicitAny, noImplicitThis, useUnknownInCatchVariables)이 모두 true로 설정됩니다.
2️⃣ alwaysStrict
Default: true if strict; false otherwise
alwaysStrict를 true로 설정하면 JavaScript파일이 ECMAScript의 strict mode로 컴파일됩니다.
1
2
3
4
5
6
7
{
  "include": ["./main.ts", "./src/**/*.ts"],
  "exclude": ["./src/**/DummyComp.ts"],
  "compilerOptions": {
    "alwaysStrict": true
  }
}
1
2
3
// Comp1.ts
const a = 1;
console.log(1);
위의 TSConfig 설정으로 컴파일하게 되면 Comp1.ts 파일은 다음과 같이 컴파일 됩니다.
1
2
3
"use strict";
var a = 1;
console.log(a);
컴파일된 JavaScript 파일에 use strict가 추가되었음을 확인할 수 있습니다.
3️⃣ noImplicitAny
Default: true if strict; false otherwise TypeScript 변수에 타입을 지정하지 않으면, any 타입으로 해당 변수의 타입을 추론합니다. 타입이 any일 경우 오류가 발생할 수 있습니다.
1
2
3
4
5
function fn(s) {
  console.log(s.subtr(3));
}

fn(42);
위 코드에서 subtr은 substr를 잘못 입력한 것 입니다. 하지만 인자 s의 타입이 any로 추론이 되어 TypeScript는 오류를 발생시키지 못하고 런타임시 오류가 발생하게 됩니다.
이때 noImplicitAny 옵션을 true로 설정해 변수의 타입을 지정하지 않아 any로 추론되는것을 방지할 수 있습니다.
4️⃣ noUnusedParameters
true 로 해당 옵션을 설정할 경우, 함수의 파라미터를 사용하지 않으면 오류가 발생합니다.
5️⃣ noUnusedLocals
true 설정될 경우, 사용하지 않은 지역변수가 있을 시 오류가 발생합니다.
6️⃣ noImplicitReturns
true로 설정할 경우, 함수의 모든 케이스에서 값이 리턴되는지를 검사합니다. 만약 값을 리턴하지 않는 경우가 있다면 오류가 발생합니다.
👨💻 JavaScript Support
1️⃣ allowJs
Default: false
해당 옵션을 true로 설정하면, TypeScript 프로젝트에 JavaScript 파일을 추가할 수 있습니다. 즉 해당옵션을 true로 설정하지 않으면 JavaScript 파일을 TypeScript 프로젝트에 사용할 수 없습니다.

위와 같은 폴더 구조를 가진 프로젝트가 있다고 가정해보겠습니다. 이 프로젝트에서 Comp1.ts는 ThirdPartyComp.js를 임포트하고 있습니다.
1
2
// ThirdPartyComp.js
export const name = "hi";
1
2
// Comp1.ts
import { name } from "./ThirdPartyComp";
위 코드가 포함된 프로젝트를 아래와 같은 TSConfig로 컴파일할 경우 다음과 같은 오류가 발생합니다.
1
2
3
4
5
6
7
8
{
  "include": ["./main.ts", "./src"],
  "exclude": ["./src/**/DummyComp.ts"],
  "compilerOptions": {
    "outDir": "./dist",
    "strict": true
  }
}
error TS7016: Could not find a declaration file for module ‘./ThirdPartyComp’. ‘~~~/src/components/ThirdPartyComp.js’ implicitly has an ‘any’ type.
이 오류는 any 타입으로 인해 발생한 오류입니다.
ThirdPartyComp.js에 선언된 변수들에 대한 타입을 찾을 수 없어 타입이 any로 추론되는데 strict 옵션이 true일 경우 any 타입은 허용되지 않습니다.
이번에는 JavaScript 파일을 TypeScript에 임포트하지 않고 TSConfig 파일의 include 옵션에 추가해 보겠습니다.
1
2
3
4
5
6
7
{
  "include": ["./main.ts", "./src/**/*.ts", "./src/**/*.js"],
  "exclude": ["./src/**/DummyComp.ts"],
  "compilerOptions": {
    "outDir": "./dist"
  }
}
위와 같은 TSConfig 파일에서 tsc 명령어를 실행하면 JavaScript 파일은 컴파일에서 제외되는것을 볼 수 있습니다. 
2️⃣ checkJs
allowJs가 true로 설정되었을 때, 해당 옵션을 true로 설정하게되면 TypeScript Compiler는 JavaScript 파일도 타입검사를 수행합니다.
1
2
3
// ThirdPartyComp.js

export const pi = parseFloat(3.142);
parseFloat은 인자로 문자열을 받기때문에 위 코드는 잘못된 코드입니다. 하지만 JavaScript로 작성되었기 때문에 타입오류가 발생하지 않습니다.
이는 해당 파일을 TypeScript 파일에 임포트해도 마찬가지 입니다.
1
2
3
4
// Comp1.ts

import { pi } from "./ThirdPartyComp";
console.log(pi);
따라서 해당 파일은 타입 오류가 발생하지 않게되어 런타임 환경에서 오류가 발생하게 됩니다.
추가로 checkJs를 true로 설정하는 것은 JavaScript 파일 최상단에 // @ts-check를 추가하는 것과 같습니다.